GASで簡単!図形の挿入・操作・描画・削除・取得の完全ガイド


でも、GoogleスライドならGASで自由に図形を挿入・操作できるぞ。
GASで図形を挿入する方法
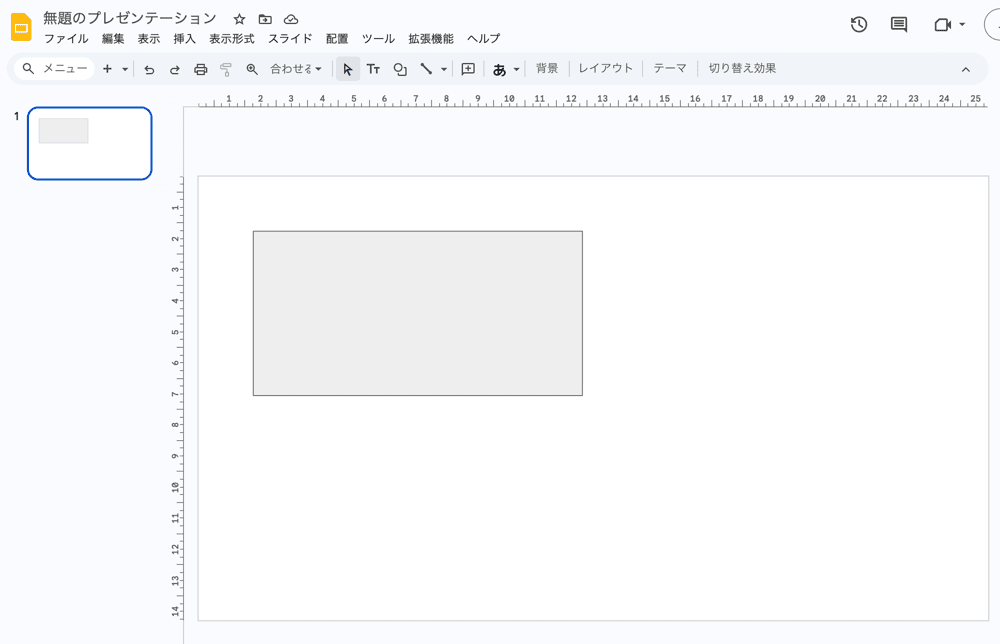
GASならGoogleスライドに簡単に図形を挿入できる。次のコードを見てみよう。
function insertShape() {
  const presentation = SlidesApp.getActivePresentation();
  const slide = presentation.getSlides()[0];
  slide.insertShape(SlidesApp.ShapeType.RECTANGLE, 50, 50, 300, 150);
}
– SlidesApp.getActivePresentation() で現在編集中のプレゼンテーションを取得する。
– getSlides()[0] で最初のスライドを指定する。
– insertShape() で指定した形(この場合は長方形)をスライドに挿入している。
このコードを実行すると、こんな感じで長方形を挿入できる。
GASで図形を操作する方法
挿入した図形の色や位置を変更することもGASで可能だ。操作する例を見ていこう。
function manipulateShape() {
  const presentation = SlidesApp.getActivePresentation();
  const slide = presentation.getSlides()[0];
  const shape = slide.insertShape(SlidesApp.ShapeType.RECTANGLE, 50, 50, 200, 100);
  shape.getFill().setSolidFill('#0C6DFD');
  shape.setLeft(100);
  shape.setTop(100);
}
– getFill().setSolidFill() で図形の塗りつぶし色を設定する。
– setLeft() と setTop() で図形の位置を変更する。
このコードを実行すると、こうなる。
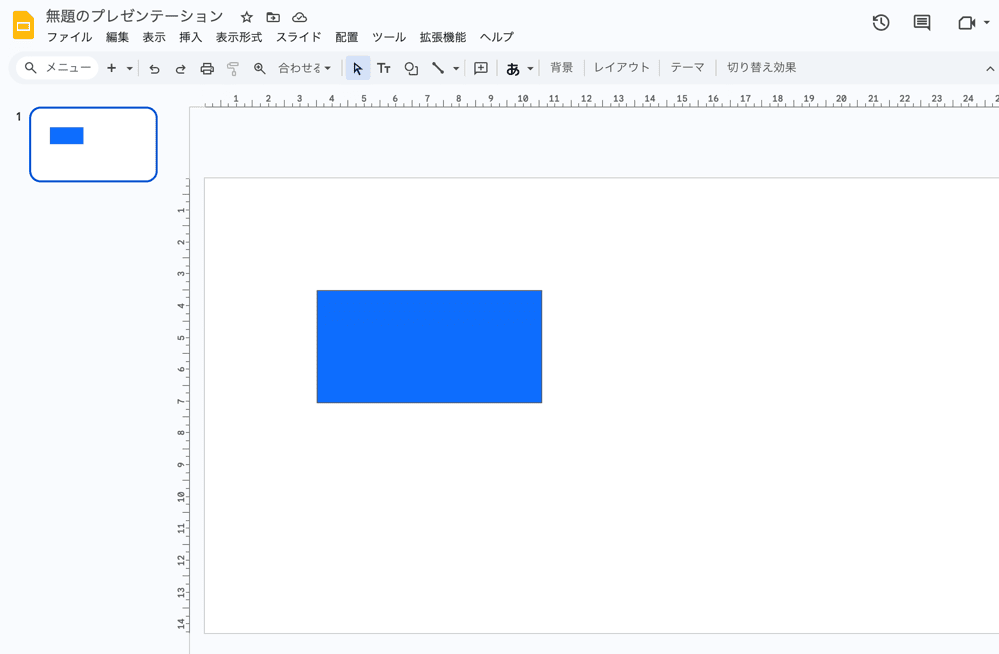
みろ、長方形の色が変わって、長方形の位置も若干右下に移動したよな。
GASで図形を描画する方法
GASで図形を描画する際に、それぞれのプロパティを細かく調整できる。
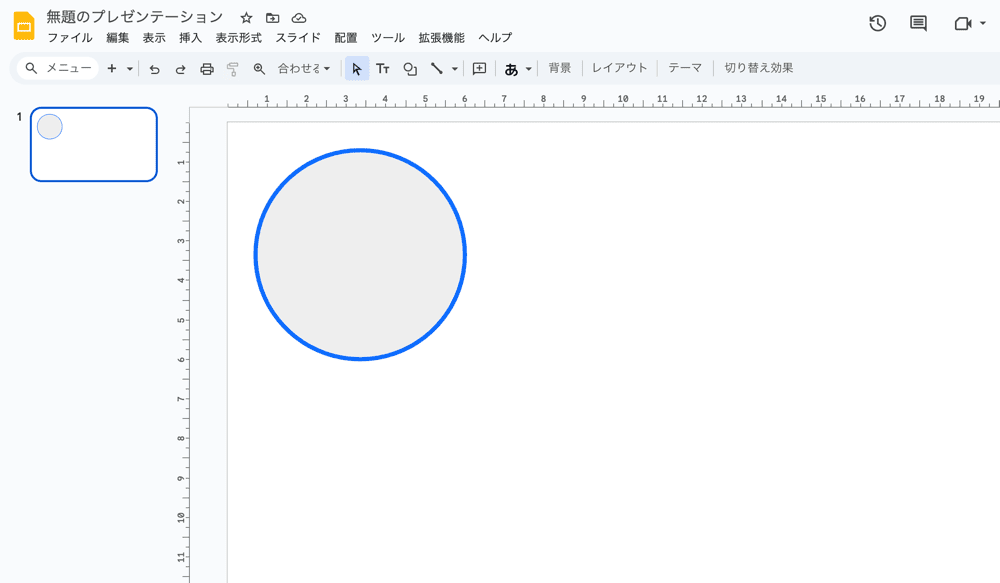
以下は、楕円を描き、境界線をカスタマイズするスクリプトだ。
function drawShapeWithDetails() {
  const presentation = SlidesApp.getActivePresentation();
  const slide = presentation.getSlides()[0];
  const shape = slide.insertShape(SlidesApp.ShapeType.ELLIPSE, 20, 20, 150, 150);
  shape.getBorder().setWeight(3);
  shape.getBorder().setSolidFill('#0C6DFD');
}
SlidesApp.getActivePresentation()… 現在編集中のスライドを取得getSlides()[0]… 最初のスライドを指定insertShape(SlidesApp.ShapeType.ELLIPSE, 20, 20, 150, 150)… 楕円形を挿入(座標20,20/幅150/高さ150)shape.getBorder().setWeight(3)… 境界線の太さを3ptに設定shape.getBorder().getLineFill().setSolidFill('#0C6DFD')… 境界線の色をブルー(#0C6DFD)に設定
このコードを実行すると、こうなる。
GASで図形を削除する方法
挿入した図形が不要になった場合、GASで削除することも可能だ。
function deleteShape() {
  const presentation = SlidesApp.getActivePresentation();
  const slide = presentation.getSlides()[0];
  const shapes = slide.getShapes();
  shapes[0].remove(); // 最初の図形を削除する
}
– getShapes() でスライド上のすべての図形を取得し、remove() で削除する。
GASで図形を取得する方法
すでにある図形に対して操作をしたい場合は、図形を取得する方法を学ぼう。
function getShapeAndLogDetails() {
const presentation = SlidesApp.getActivePresentation();
const slide = presentation.getSlides()[0];
const shapes = slide.getShapes();
if (shapes.length > 0) {
const shape = shapes[0];
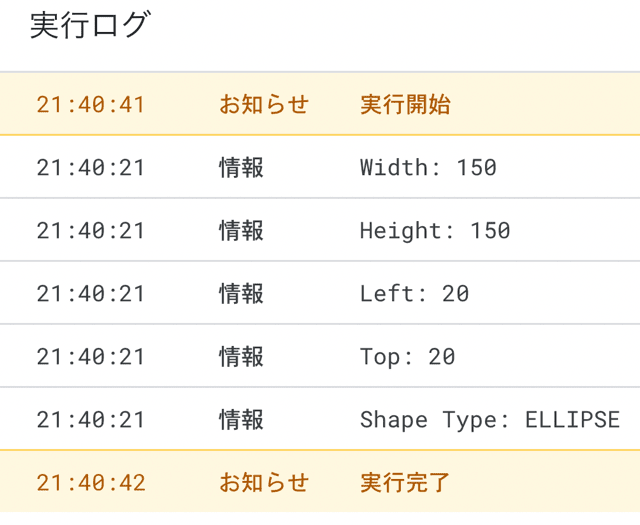
// 図形の幅と高さを取得(正しい方法)
const width = shape.getWidth();
const height = shape.getHeight();
// 図形の位置も取得可能
const left = shape.getLeft();
const top = shape.getTop();
// ログに出力
Logger.log('Width: ' + width);
Logger.log('Height: ' + height);
Logger.log('Left: ' + left);
Logger.log('Top: ' + top);
// 図形のタイプも確認可能
Logger.log('Shape Type: ' + shape.getShapeType());
} else {
Logger.log('No shapes found on the slide');
}
}
– getBounds() でその図形の寸法を取得でき、プロパティとして getWidth() や getHeight() が使用可能だ。
実行すると、次のようなログが出るはずだ。
練習問題
以下の問題に取り組んで、GASでの図形処理を確認してみよう。
1. Googleスライドに黄色の円を挿入し、位置を(200, 200)に設定してください。
2. 上記の円に青色の輪郭をつけてみましょう。
3. 作成した円を削除してください。
解答と解説
function practiceShapes() {
  const presentation = SlidesApp.getActivePresentation();
  const slide = presentation.getSlides()[0];

  // 問題1: 黄色の円を挿入
  const yellowCircle = slide.insertShape(SlidesApp.ShapeType.ELLIPSE, 200, 200, 100, 100);
  yellowCircle.getFill().setSolidFill('#FFFF00');

  // 問題2: 青色の輪郭を追加(正しい方法)
  yellowCircle.getBorder().setWeight(2);
  yellowCircle.getBorder().getLineFill().setSolidFill('#0C6DFD');

  // 問題3: 円を削除
  // yellowCircle.remove(); // コメントアウトして図形を残す場合
}
– insertShape() で円を挿入し、色を設定。
– getBorder().setSolidFill() で輪郭の色を青に設定。
– 最後に remove() メソッドで円を削除。